PGP für Pegasus Mail - PGP for Pegasus Mail
idw's PGP-Frontend for Pegasus Mail
(6.3.0.0 / 08-2024)
CONTENTS
Purpose of the Program
This extension for Pegasus Mail implements the most important cryptographic and key/certificate management functions of Pretty Good Privacy™ versions 6.5.x, 7.x, 8.x and 9.x through 10.3 in Pegasus Mail 3.xx - 4.xx / 32bit on Windows XP through Windows 10. It works best with Pegasus Mail v4.3 or later on Windows XP or later. PGP versions prior to 6.5.1 ARE NOT AND WILL NOT be supported anymore.
Requirements for Proper Use
The above listed versions of Pegasus Mail and PGP have to be installed properly under Windows and configured according to the respective instructions: Basic understanding of PGP and Pegasus Mail is required!
IMPORTANT NOTE ON RELEASE CHANGES: Every major release change of the underlying systems (Windows, Pegasus Mail or PGP) may cause problems with the currently available version of this extension. As long as new versions aren't explicitly mentioned here there is no sufficient experience with using it with new versions of the above listed software (with regard to that I request you to report any problems that are not covered in this documentation - especially with new versions of Windows).
Files in the Program Package
The setup archive (ZIP-file) contains the executable setup and my detached PGP signature for verifying its integrity. The "Xx" in the following list substitutes the respective language code (e.g. "En" for the English version). The English version is always included in any setup package:
| PMPGPManualXx.htm: | Detailed instructions for using this Pegasus Mail extension |
| PMPGPHistoryXx.htm: | Version history of the extension |
| PMPGPNavigateXx.htm: | Index for comfortable use of the manual |
| PMPGPHelpXx.htm: | Frame loader for the above mentioned files |
| PMPGPHelper.exe: | Application providing some internal tools and utilities |
| PMPGPMain.dll: | Main library containing the PGP interface |
| PMPGPCryptor.dll: | Library containing the Pegasus Mail interface |
| PMPGPMain.fxx: | Main library interface data for Pegasus Mail |
| PMPGPCryptor.fxx: | Cryptographic interface data for Pegasus Mail |
| PGPErrorStringsXx.txt: | Text files containing PGP's error messages |
| PMPGPStringsXx.txt: | Files providing all other text resources |
| PMPGPXx.chm: | Help file for miscellaneous program dialogs |
| POPUPSXx.htm: | Help texts for the configuration dialog |
| AutoList.txt: | Sample file with address and key data for automated PGP processing |
| LicenceXx.txt: | Licence information for private and commercial use |
| bmp-files | Nine image files for buttons in Pegasus Mail's toolbar |
| gif/png-files: | Five illustrations for the manual |
The program uses a modified Delphi implementation (see Sébastien Sauvage's ISAAC page) of Bob Jenkins' random number generator ISAAC and modified versions of Primoz Gabrijelcic's Time Zone Routines v1.2 and Ralf Junker's Base64 module rjMime resp. DIMime version 1.5. The PGP interface is based on Steve Heller's former SPGP library source codes. The installer is Inno Setup by Jordan Russell.
Program Installation
The above listed files will be copied (by the setup program, an already existing configuration will not be changed) to a directory of your choice (though the path length including the file names must not exceed 127 characters) and a subdirectory called Resources. Besides, six entries will be added to a new program group folder (Pegasus Mail PGP Utilities) in your Start menu's Program Files folder:
- Contact loads PMPGPXx.chm with a page containing several links and the author's PGP key;
- Licence loads PMPGPLicenceXx.txt;
- Help Manual loads PMPGPHelpXx.htm into your default browser;
- Uninstall PM-PGP does exactly so;
- User-Setup has to be started each time new (Windows or Pegasus Mail) users with Pegasus Mail mailbox folders of their own want to use this extension; only for the very first user installing the extension this may be done automatically (if the respective Windows user ever started Pegasus Mail before). All configuration settings (except for the default keyserver) are user specific and don't change PGP's default settings (for PGPkeys, PGP Desktop e.g.)!
- User-Uninstall removes the fxx-files, AutoList.txt and PMPGP.cfg from the respective user's mailbox folder if they have been successfully installed via User-Setup. To manually remove these files you need to locate the user's home mailbox via Pegasus Mail's Help | About Pegasus Mail... | Info.
The extension fff of the interface data files indicates the English version of the package. Other language specific versions are also available. Since version 4.9.5.1 it is possible to easily switch language versions provided the respective Pegasus Mail versions are installed: To do so you just have to install the proper additional resource files from the respective archives (as of version 5.0 the English version is automatically installed along with other languages); after doing so the appropriate language will automatically be selected when starting Pegasus Mail.
If you encounter any setup problems please take a look at Additional Information ... to setup or modify the extension manually.
You'll find the following modifications in Pegasus Mail after successful installation:
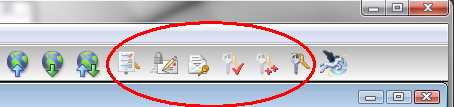 If the option A fixed toolbar under the menu is selected on Tools | Options | Toolbars and there's enough space available there will be six new buttons on the toolbar (cf. screen shot). To free space you might rename the bitmap files of some rarely used extensions (e.g. ...~bmp instead of ...bmp) which still will be accessible via their menu entries in Tools | Extensions. An extension consists of files like in this package: a dll-library, a bmp-bitmap, an fxx-config file and in some cases also a help file - usually of the same name. In the extension's configuration dialog you may dis- or enable these new buttons (except for the first one) according to your preferences as their functions also are accessible via menu entries (s. next section).
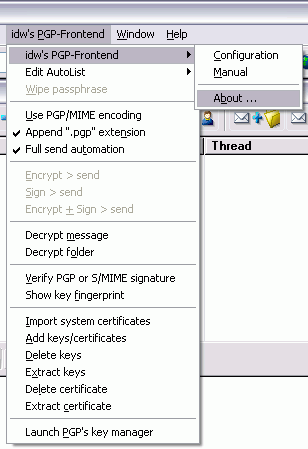
Pegasus Mail's main menu bar will contain a new entry (cf. screen shot) providing several new PGP related functions (some of them are disabled if no editor or reader window is on top). You can get detailed information about these functions via context help by pressing the [F1] key while highlighting one of its entries.
Besides the two buttons to the left of the PGPkeys/PGP Desktop button you'll find - if a mail folder is open - two new menu entries under Folder | Special called Find/verify digital signature and Key management.... After opening a mail message the same items show up under Reader | Special and in the window's context menu (press right mouse button in there). If a message is marked or opened the respective functions will be executed:
Key management (or the respective button) may import public keys or certificates contained in a message into your PGP keyring. Keys will be detected automatically in encrypted /signed messages if the extension's option Auto key check is enabled; you will not be prompted for importing certificates, though, as each S/MIME signed message usually contains the sender's certificates anyway.
Find/verify digital signature (or the respective button) is useful for retrieving details about a digital signature if you're working with the No signature info extension option enabled or a signature wasn't recognized automatically. For valid S/MIME signatures it will display the Windows certificate dialog where you can check the signing certificate's properties and chain validity in detail (only available with Pegasus Mail v4 on Windows 2000 Pro or XP and later).
3. Additional Information for Administrators
- During installation most files will be copied to a user defined directory (or its subdirectory) registered together with other program information under:
HKEY_LOCAL_MACHINE\SOFTWARE\Microsoft\Windows\CurrentVersion\Uninstall\Pegasus Mail PGP Utilities_is1. -
To finish installation the program PMPGPHelper.exe will be launched from this directory using the command line parameter UserUpdate to copy the following files to Pegasus Mail's mailbox directory of the current user:
- AutoList.txt
- PMPGPMain.fff
- PMPGPCryptor.fff
The directory's name will be retrieved from the following registry key:
HKEY_CURRENT_USER\Software\Pegasus Mail\Mailbox.
If such a registry key cannot be found the installing user will be prompted for selecting Pegasus Mail's program directory for installing the extension for all users.The paths to PMPGPMain.dll and PMPGPCryptor.dll will then be written to each fff-file's respective line:
Form DLL = "DRIVE:\Path\*.dll".The fff-files may also be copied to the mailboxes of all other users registered in Users.cfg depending on the installer's confirmation and access rights. Users.cfg will be created in ..\Documents and Settings\All Users\Application Data\PMPGP\ if it doesn't already exist.
- The last action of PMPGPHelper.exe will be to show the configuration dialog for creating the very first version of PMPGP.cfg (a simple ini-file) also located in the mailbox directory.
- A new group called Pegasus Mail PGP Utilities will then be created in the start menu under Program Files containing the following five links:
- Contact to PMPGPEn.chm
- Licence to LicenceEn.txt
- Uninstall PM-PGP to uninsXXX.exe
- User-Setup to PMPGPHelper.exe with the command line parameter UserSetup
- User-Uninstall to PMPGPHelper.exe with the command line parameter UserUninstall
User-Setup and User-Uninstall will be created in the All Users section as well as they are required for executing steps 2 and 3 and the uninstallation for both configuring new Windows and Pegasus Mail users.
- For running the extension the registry only needs to be read (including all entries of Pegasus Mail's, PGP's and the extension's keys). Write permission has to be granted for the following files: AutoList.txt and PMPGP.cfg in Pegasus Mail's mailbox directory of the respective users (attention: a single Windows user may create several Pegasus Mail users) and the default TEMP directory. Additionally the following Pegasus Mail files need to be readable: PEGASUS.INI, PMAIL.INI, *.PMM (mail folders) and *.PMR (address books). And finally (depending on the respective PGP version) write permission is required for the following files, usually located in Windows' main directory (6.5.x) or a user dependent directory (e.g. ..\Application Data\PGP Corporation\PGP\, 7.x and later):
- PGPsdk.dat (6.5.x)
- PGPprefs.txt (7.x / 8.x)
- PGPprefs.xml (9.x)
- and PGPgroup.pgr if using key groups (except for PGP 9).
Using the program
After installing the package and applying the basic configuration you may just start working without having to change any further options, but to take full advantage of the special automation features you have to set up a list of addresses and assigned keys. The leftmost of the new buttons provides a separate Edit AutoList menu which will assist you in doing so. To find out about the basic operations please read the following paragraphs.
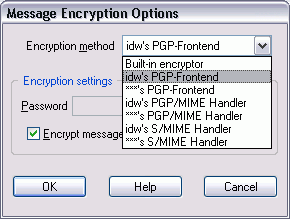 Normal encryption: Check Encrypt... in the message editor and select Encrypt message in the dialog box shown left, then click OK: The Encryption method should already be selected, if not you may do so under Tools | Options | Encryption; idw's S/MIME Handler will only be available if you have a private key with a valid S/MIME certificate on your keyring. Selecting a method item beginning with "***" will result in creating just a single outgoing message for all recipients (and another one for any blind copy recipients) instead of a separate one for each single recipient: While this will save you bandwidth it may result in recipients not being able to read an encrypted message if you don't have or don't use the proper PGP key or certificate. Mixing encrypted and unencrypted messages won't work either and there's no way of using these methods in an automated way nor keeping such a selection "sticky".
When pushing the Send button the encryption process starts (watch Pegasus Mail's status bar at bottom left) and you will get asked to select a public key for any recipient address provided for the respective message and its attachments. If you check Add digital signature as well you will get prompted for entering your passphrase prior to selecting the keys (you don't need to provide it via Pegasus Mail's own encryption dialog).
If you don't want to get repeatedly asked whether to encode attachments or not (PGP/MIME and S/MIME include attachments by design), check Encrypt/Sign attachments on the Encoding page of the extension's configuration dialog (idw's PGP-Frontend | idw's PGP-Frontend | Configuration).
List encryption: If you've created key groups in PGP you may send multi-encrypted messages to mailing lists by selecting the desired group in the key selection dialog for the respective message. Automated encryption is not available in such cases. Unfortunately you cannot create key groups anymore with PGP 9 (at least up to version 9.6.1), but if you kept any groups created with PGP 8 you may still use them.
PGP/MIME encryption: This option is available for the first time in version 4.7.0, but it should only be used if you know about your recipient's email program being able to deal with it (e.g. Mutt for Linux or Eudora for Windows/Mac, more information). Some of PGP/MIME's advantages are that it automatically includes attachments and can easily deal with formatted and non-English messages.
Since version 4.8.9 PGP/MIME will automatically be used under the following conditions:
- You're replying to a PGP/MIME encoded message with Include text of original message ... enabled;
- the only single recipient is the original sender of the message replied to;
- and Auto encryption is enabled (see below).
As of version 4.9.6 you may also enable selected recipients via AutoList to always receive PGP/MIME-encoded messages provided your AutoList has been activated (see Automated encryption below).
S/MIME encryption (PGP 8.1 (English version) and later only): This option is available for the first time in version 5.0, but it should only be used if you know about your recipient's email program being able to deal with it. The respective encryptor option will only be enabled if your keyring contains a secret key with a valid S/MIME certificate. Encryption and signing are handled exactly the same way as with PGP/MIME (see above), only the email address used with the respective Pegasus Mail identity must be certified, i.e. signed by certificate issuers!
Easy encryption: After finishing typing your message you can simply click Encrypt > send or Encrypt + Sign > send in the menu idw's PGP-Frontend. This will check all necessary options automatically and push the Send button for you. These menu entries can also be presented via a separate menu by right clicking the respective toolbar button which you may as well configure to execute any of these single options by left clicking. If a recipient is listed on your AutoList the encoding method will be taken from the appropriate list entry (see the following paragraphs).
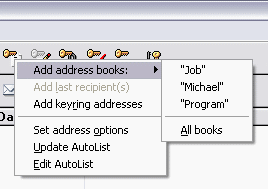
Automated encryption (thanks to Gary Siemund ...): You might already think: Why can't I have the encryption module automatically find the required public key? Well, you can, but you should prepare the AutoList for doing so (though most of the keys will probably be found without it): After enabling the Auto encryption feature at first you should add your keyring addresses to the list by clicking Add keyring addresses in the Edit AutoList menu. You will get a dialog where every single key (if not invalid, disabled, revoked or expired) will be listed: In there you may select the encryption/signing options you want to apply to the key's addresses and check the Add address to AutoList checkbox for the keys you'd like to add (all sub-addresses will be added as well). Next step - if you're working with address books in Pegasus Mail - would be to click any of the Add address books submenu entries in the same menu. This will present a list of the address book addresses you may select from and set options for (both email address and alias name will be added; while moving through the key ID list the selected key's most important properties will be shown).
Now you can start using the Auto encryption feature along with Auto key selection (you have to enable both of them): Whenever you press the Send button and any of the message recipients' addresses is listed and enabled, the processing will start automatically after confirming Pegasus Mail's encryption dialog and you won't have to do anything else except for addresses not yet listed or providing your signing passphrase (unless you enable the Store passphrase option as well). To avoid having to confirm the processing in Pegasus Mail's encryption dialog (except for addresses with the respective option set) check Full send automation in the menu idw's PGP-Frontend (this will also set the default encryption/signing options for adding addresses to the list): You will not be able to manually change the encryption method in Pegasus Mail's encryption dialog when using this feature. If you want to get a notification about successful encryption you may enable the option Encryption confirmation. To get a short description of which options to set for full automation take a look at the online help by clicking the question mark on the bottom bar of the configuration dialog. Please make sure to read the following Problems and Hints section!
 Updating the AutoList: In case of an address missing on the list there are four more ways of adding addresses:
- If you're adding a new key to your list right from a message or its attachment using one of the Key management functions you will automatically get prompted to add the new address(es) to the AutoList.
- If you're using a new address and start encryption manually you may press the Use and add to AutoList button in the key selection dialog (only adds the actual email address, not any alias name, which can't be accessed this way).
- If you've been using an alias name for addressing an encrypted message you may click Add last recipient(s) in the Edit AutoList menu after sending a message.
- And finally you may select an email address from an open reader window and press [Shift]+[Ctrl]+[F10] (or [Ctrl] + menu key) or click the right mouse button while holding down the [Ctrl] key (only works with unformatted text).
Duplicates will be detected and removed automatically, bare email addresses will not be added if they are already present within another entry. By clicking Update AutoList all addresses assigned to disabled, revoked, expired or deleted keys will be removed from the list, and Set address options enables you to edit the options of all listed addresses. To force the program to ignore options set on the list you may manually start encryption or signing; if using any of the menu entries or buttons PGP/MIME or S/MIME preferences of list entries will be honoured.
- ATTENTION when sending "mixed messages": It is possible to simultaneously send encrypted and unencrypted (or clear-signed) messages to different recipients, but this would totally screw up the purpose of encryption, as it's very easy by tracking the unencrypted copies to several users to find out what the encrypted message contains as all recipients are listed in every single message's headers (unless you're using hidden BCCs, see Tools | Options | Sending mail | Advanced Settings). If you don't want this to happen you should keep the Mixed options warning enabled which will also result in being always prompted for selecting the encryption options to apply to all messages within Pegasus Mail's dialog if you don't cancel or send all messages in the clear.
-
ATTENTION with forwarding messages: Unfortunately this is a rather confusing issue, which needs to be addressed by David Harris in my opinion. A general note in advance: Don't forward encrypted attachments unless they are already encrypted to the new recipient key(s), as Pegasus Mail doesn't trigger decryption prior to forwarding.
- "Bouncing": There's a difference between PM v4 and PM v3: The latter forwards all message parts unmodified whereas PM v4 prompts for decryption of encrypted body parts before forwarding. Attachments are always forwarded "as is".
- Forwarding after editing: Only decrypts message bodies for editing, attachments are forwarded "as is".
- Forwarding as attachment: None of the message parts gets decrypted prior to forwarding.
- Forwarding as digest: None of the message parts gets decrypted prior to forwarding.
- ATTENTION with Pegasus Mail's signatures: Adding Pegasus Mail's signatures to automatically encrypted messages may fail in version 3.
- Line length: To avoid destruction of PGP's message armoring - which disables decryption by the decrypting PGP program - you have to set the line length in Pegasus Mail's editor to at least 65 (76 is recommended; Use exact character measurement for right margin on Tools | Options | Message settings in v3 may help). The line length can also be adjusted via the extension's configuration dialog (Pegasus Mail => Miscellaneous).
- Attachments: To ensure a correct handling of attachments the Pegasus Mail options Use MIME features on Tools | Options | Message settings and Send enclosures instead of attachments on Tools | Options | Sending mail are activated automatically for each messages.
- Distribution lists don't trigger automated encryption unless you include an address from the AutoList in any of the addressing lines. In general I would not recommend using encryption with large lists for at least to reasons: Firstly, most lists will probably cause the previous mentioned mix of encrypted and unencrypted messages to be sent; secondly, you will end up with as many single messages being sent as you have recipients on the respective list as there currently is no sufficient way to have a single multi-encrypted message processed due to Pegasus Mail's limitations. Since version 4.8.4 you may use PGP's key groups instead (up to version 8.1) which cannot be used in an automated way, though.
- Copy to self does not save encrypted messages as this functionality is not supported by Pegasus Mail (work-around: copy the encrypted mail from the Queue manager or send it as a blind copy to a separate address of yourself and define a proper filter rule).
- When canceling encryption using the Copy option blank messages with an invalid recipient line will be queued, which will finally be deleted when delivering the messages via Pegasus Mail's built-in SMTP mechanism.
- Encryption always includes encryption to your own key, depending on your actual Pegasus Mail identity: If the ID's email address is associated to any of your keys the first matching key (otherwise the default signing key) will be used unless you have the option Always use default key enabled. Changing the signing key in its passphrase dialog will also change the encryption key to the one selected in there.
- Conventional (symmetrical) PGP encryption is not supported.
- Setting or changing the Permanent BCC on Tools | Options | Sending mail will only be valid for the automation features after relaunching Pegasus Mail (immediately since Pegasus Mail v4.3).
Automated decryption: Decryption of an encrypted message including possible attachments will usually be done automatically when opening or saving a message or its attachment provided Pegasus Mail is able to recognize the use of PGP properly: To be sure enough you should configure the Number of lines to scan for enclosures on Tools | Options | Advanced to at least 25 (recommended 100), which can also be done using the extension's configuration dialog by estimating the actual header length of received emails (the first 10 messages of a folder are checked). The passphrase can be stored for repeated decryption if Store passphrase is enabled in the configuration dialog. For security reasons it is wiped and encrypted again internally each time it has been used successfully; PGP's internal passphrase caching is used with PGP 8 and later.
Manual decryption: If the encryption cannot be recognized by Pegasus Mail you may use the Decrypt (unrecognized) message button or menu entry for decrypting a message to a separate window. To internally mark such messages as encrypted (thereby allowing Pegasus Mail to automatically recognize them afterwards) you may set the appropriate flag directly: Select the message in its folder, press [F12] and check Is encrypted. If an attachment cannot be recognized as encrypted just save it to file and decrypt it using PGP after attaching a .pgp extension - if it isn't already there. NB: Pegasus Mail v3 cannot decrypt messages correctly when saving them from a folder. You may save them unmodified (= undecrypted) after disabling the respective flag (select the message in its folder, press [F12], uncheck Is encrypted), though - but you have to reverse the flag afterwards to have the message text automatically decrypted when opening it again.
Folder decryption: By using the respective entry in the menu idw's PGP-Frontend you may also decrypt complete mail folders (especially useful for searching messages, as the internal find function cannot search encrypted messages). Such decrypted folder can be exported to a file and be encrypted again, if desired. Attachments that don't solely contain plain or encrypted text will be listed but not included.
- When replying to an encrypted or signed message using the option Selected portion (include) older versions of Pegasus Mail (prior to v4.3) will prompt you with its internal decryption dialog indicating the Built-in encryptor: Just click OK to close the dialog without any further input (Cancel doesn't include the selected text).
- Attachments with .asc or .pgp file extensions will not be decrypted before saving and/or opening them from within Pegasus Mail as such files are expected to contain PGP data when using them outside of Pegasus Mail. You should avoid using the (leftmost) Open button (Run an application to open and display this attachment, View in PM 3), though, as Pegasus Mail removes the original (non-PGP) file extension when creating a temporary file for viewing.
-
PGP/MIME and S/MIME: These kinds of messages will be recognized automatically (except in IMAP folders), but to work more conveniently with these you may need to manually adjust one of the message property flags Pegasus Mail assigns automatically if this hasn't been done already after downloading from a POP3 server: Disable Is a valid MIME message (right click the message in its folder and select Message properties... to do so). If you don't change this flag older versions of Pegasus Mail (prior to v4.3) will prompt you with its internal decryption dialog when encountering PGP/MIME or S/MIME signed messages. When displaying such messages some options don't work as expected, though: changing line breaks, fonts and formatted view.
To extract attachments you have to take the following steps (a respective hint will be shown as gray text below the decoded message text):
- Pegasus Mail v3: Open the message and press the Attach button.
- Pegasus Mail v4: In the preview window click the small (right hand) attachment icon on the details ribbon. Using the Decrypt (unrecognized) message menu entry or the respective button will achieve the same in reader windows.
Tip: You may create a special filter rule to automatically highlight PGP/MIME messages when opening the new mail folder: Select Rules applied when folder is opened... in Tools | Mail filtering rules | Edit new mail filtering rules, click Add rule, select Regular expression match from the first selection box, and enter Content-Type:*application/pgp-* (including the asterisks like shown here; Content-Type:*application/*pkcs7-* for S/MIME) in the edit box below. Then select In the message's headers only from the Appears: section, Highlight from the selection box below and the desired color from the dialog popping up afterwards. To finish adding this rule confirm by pressing OK and save your new entry by using the respective button.
Signing: Like with encryption there are three methods of signing (and PGP/MIME or S/MIME):
- The "normal way" by checking Encrypt... in the message editor, selecting Add digital signature in Pegasus Mail's dialog box (the appropriate Encryption method has to be selected as well), then clicking OK;
- The "easy way" by clicking Sign > send in the menu idw's PGP-Frontend after typing a new message;
- And the "automated way" by using the AutoList settings when pushing the Send button (cf. Automated encryption).
For selecting the signing key the extension compares a message's current Pegasus Mail identity (i.e. its respective email address) with the addresses of all available signing keys: If it doesn't find a single exact match or the option Always use default key is enabled it uses the default signing key.
Hints:
- To prevent Pegasus Mail from encoding clear-signed messages during the send process to a format not recognizable by PGP any more you should enable the Pegasus Mail option Allow 8-bit MIME message encoding on Tools | Options | Sending mail. Usually nowadays this doesn't cause problems any more (if it does, these problems don't differ from what happens with this option disabled). PGP/MIME and S/MIME simply ignore this setting according to their proper requirements.
- The signature algorithm is the standard algorithm of the signing key or RIPEMD if enabled for RSA keys in your configuration. Since PGP 9.5.x the new SHA-2 algorithms are available as well.
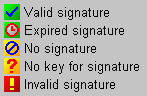 Automated verifying: Signatures will be detected automatically (provided the Number of lines to scan for enclosures is set like described above, for PGP/MIME and S/MIME see Hints) and indicated by adding a status bar icon or changing the reader icon to one of these shown left (if the message has been successfully decrypted a little key will be added; plus or minus with valid signatures indicates validity of the signing key or the certificate chain). After enabling the extension's option Remove signature data the verified text will be displayed without PGP's signature data and you can select whether or where you want to get the verification information shown. To view the original message, switch to Show all headers in the reader menu or Show raw message data in the reader's context menu (due to some inconsistencies in Pegasus Mail this causes a little mix up when changing the reader window between with/without attachments by clicking the Prev/Next buttons, but this can be corrected by resetting the menu entry).
Manual verifying: To manually check for signatures just click the appropriate button or menu entries after loading a message into a reader window: Find/verify digital signature in Reader | Special and the window's context menu (click right mouse button in there). For valid S/MIME signatures this will display the Windows certificate dialog where you can check the signing certificate's properties and chain validity in detail (only available since Windows 2000 Professional or XP). Unfortunately this doesn't work for messages with attachments unless they are PGP/MIME or S/MIME signed.
Hints:
- If a message is signed using a key not on your keyring the key ID is provided: By clicking it with the right mouse button you can retrieve the key from a keyserver (only in unformatted messages). This works in reader windows, separate verification dialogs and on Pegasus Mail's status bar (bottom left). If the latter shows signature information exceeding the available space moving the mouse across it will show the complete text.
- Due to Pegasus Mail's handling of unencrypted signed messages they will also be marked as Is encrypted in the Message properties (right click on a message in its folder window or select it and press [F12]) and thereby cause Pegasus Mail to show its internal decryption dialog when opening them after uninstalling the extension. Furthermore Pegasus Mail versions prior to v4.3 will not be able to save attachments correctly of messages with this option enabled: You have to disable it manually in these cases.
- If message replies contain the unquoted signed original data you will get a verification of the original signature. If it contains additional data (either preceding or succeeding the signed part) this will be indicated by the verification information.
- By enabling Auto server look-up you may retrieve keys automatically on signature verification if you don't have the signer's key on your keyring. You don't need to add them to your ring for verifying, but you may do so. For manually downloading such keys see the first paragraph above.
- Detached signatures of attachments cannot be verified automatically, they have to be saved to disk along with the respective attachments and verified using PGP's own mechanisms. In Pegasus Mail versions prior to v4.3 binary attachments can only be viewed internally or saved properly if the Is encrypted flag in the Message properties (right click on a message in its folder window or select it and press [F12]) is disabled.
Key and Certificate Management
PGP keys in messages or attachments can automatically be detected as well (provided the Number of lines to scan for enclosures is set like described above): The option Auto key check has to be enabled to do so. Having this option disabled you may check for keys using the respective button or the Key management... item in the Reader | Special menu or the reader window's context menu (press right mouse button in there). After adding to your keyring you will automatically be asked whether to add the attached key addresses to your AutoList (if Auto encryption is enabled).
S/MIME certificates won't automatically be presented for import as every S/MIME signed message usually contains the signing key including the required certificates anyway. Importing certificates manually will work the same way as just described, though. If you're already using S/MIME certificates with your browser or other email applications you may export them from the respective certificate database to import them into your keyring: For importing keys and certificates from files (or the clipboard) via idw's PGP-Frontend | Add keys/certificates just hold down the [Ctrl] key while selecting the menu item. Import system certificates may import private certificates from IE's certificate store, if available.
Using the Configuration Editor
The extension's configuration editor may be opened by selecting the Configuration entry in the submenu idw's PGP-Frontend. Context help will be provided for most options by pressing [F1] or the right mouse key.
Following the first installation you will be prompted automatically to check some basic settings that will be saved to a file called PMPGP.cfg. Especially you have to provide the appropriate PGP-related file paths. The program will try to extract these from the Windows Registry and PGP's own configuration.
=> Version History (Peculiarities and Problems)
THIS MANUAL DOES NOT SUBSTITUTE A PROPER KNOWLEDGE OF PGP'S AND PEGASUS MAIL'S MANUALS!
Microsoft® Windows® is © Microsoft Corporation
PGP™ is © PGP Corporation
Pegasus Mail is © David Harris